



Squishy Design for Manufacturing: 9 Rules Your Render Ignores
A 3 mm tail. Deep-set ears. A 0.4 mm eyelash relief. Two colors on a face the size of a coin. The render took forty minutes. The mold will take six weeks and cost more than the design fee — and that is the good outcome. The bad outcome is that the first shots come out of the cavity with a white stress mark across the muzzle, and nobody finds out until sample round two.
In soft TPR, the rules that decide whether a character survives production are not aesthetic. They are demolding, wall uniformity, parting-line placement, and minimum feature relief. Nine rules follow, each paired with the failure it prevents. If you only read one line: a solid cast part cannot slow-rise — slow rise comes from a hollow shell plus a filling, and that decision is locked in at design stage, long before a factory touches it.
Soft TPR does not obey hard-plastic design rules
Hard plastic holds its shape when the mold opens. Soft TPR does not. The part is stripped off a core, which means the material has to travel over the steel — stretching, dragging, and recovering on the way out. Everything that follows comes from that single physical fact.
Three consequences a render will never show you:
- Softness hides nothing; it amplifies. A wall that is 0.4 mm thin reads as "cheap" in the hand within one squeeze. A section that is 2 mm too thick reads as a hard lump in the middle of a soft toy.
- Shrinkage is a design variable. TPR moves on the order of a couple of percent between cavity and room temperature. On a single part you will never notice. On a two-part assembly, or a printed insert that has to sit in a recess, it decides whether the SKU passes incoming inspection.
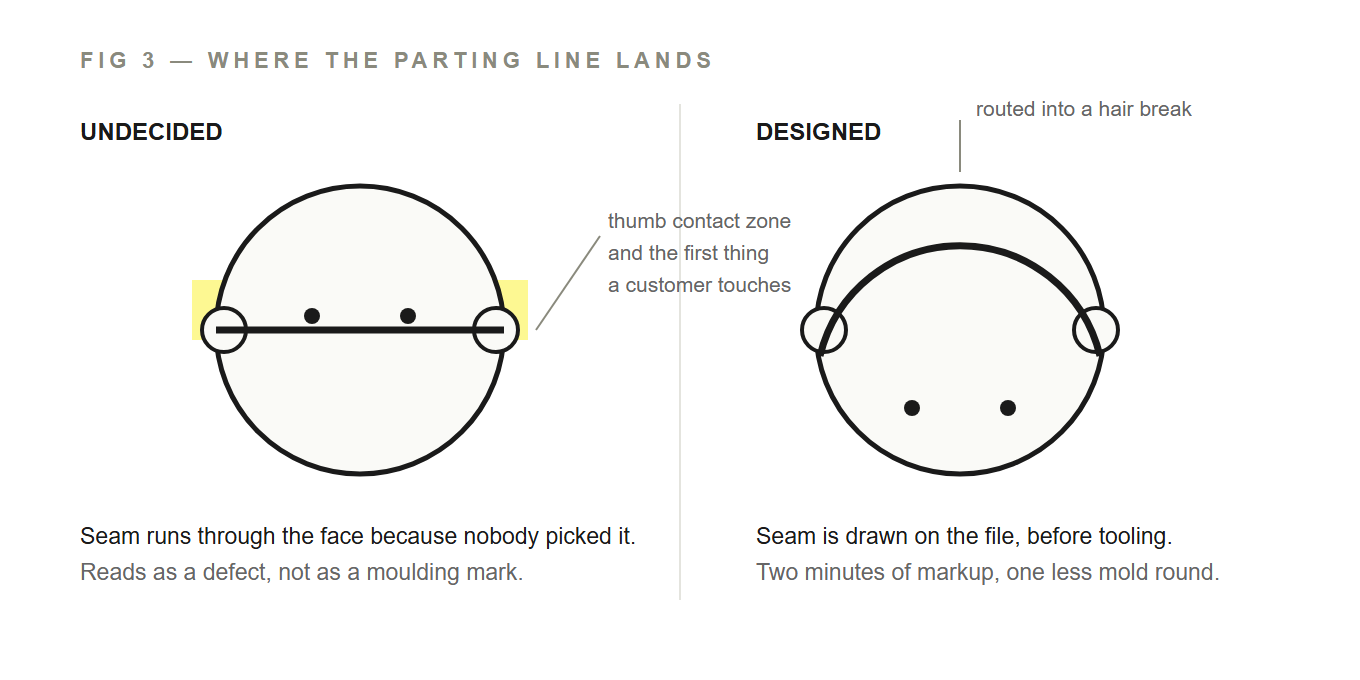
- The parting line is a visible product feature. On a hollow shell it usually runs around the silhouette — exactly where a customer's thumb goes. Designers treat it as a factory detail. It is not. It is a design decision that either gets hidden in a hair break, a groove, or a color change, or gets discovered by a customer on a shelf.
Nine rules that decide whether your character survives the mold
The table below is the working version we use when we mark up a client's STEP file. It is deliberately blunt: every row on the right is a defect we have actually shipped back to a designer.
| Rule | What the render shows | What the mold does | Design fix |
|---|---|---|---|
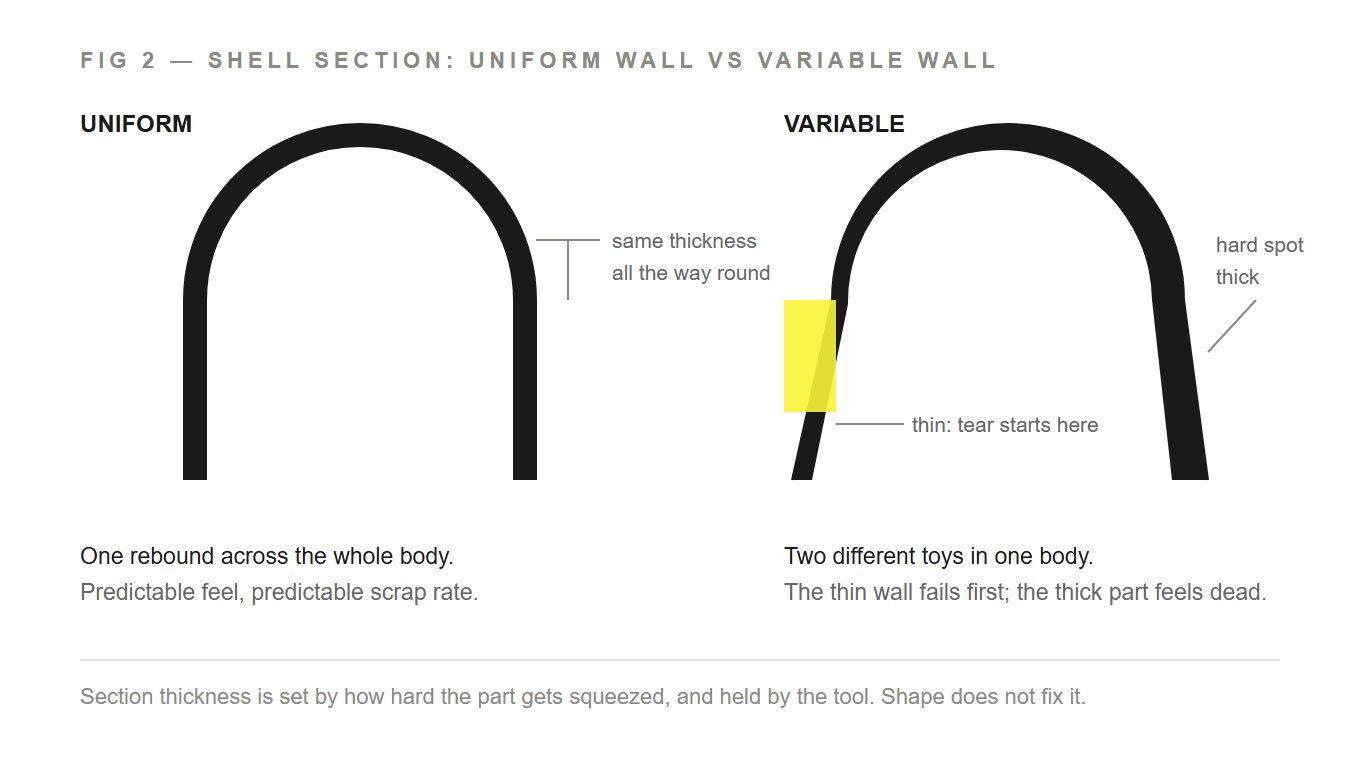
| 1. Uniform wall | Organic sculpt, thickness never specified | Thin fins tear or pinch closed; thick cores create hard spots that kill the slow rebound feel | Set a nominal wall and hold it. Thin only where the part never gets squeezed. |
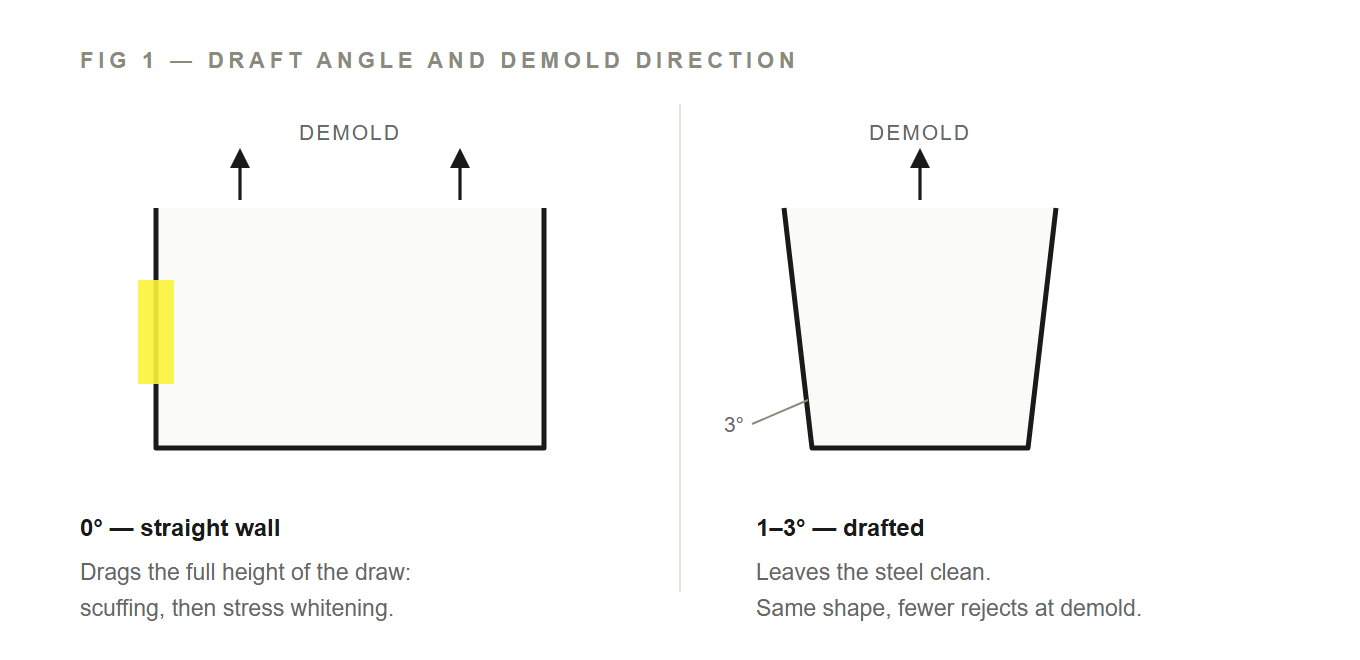
| 2. Draft on every vertical face | Perpendicular walls, because that is what looks clean in the viewport | Drag marks and scuffing on the way out; stress whitening that reads as a defect | Add draft on all vertical faces; more where the surface is textured. |
| 3. Undercuts sized for flex | Deep-set ear cavity, a barbed tail, a snap-fit lid | Soft material will strip over a shallow undercut; past that, it tears — or you pay for a slide | Keep undercuts shallow and put them on the strip direction. If it needs a slide, decide that before tooling. |
| 4. Parting line as a design feature | Nothing. The seam is invisible in a render. | Lands across the face, or through the logo, because no one picked a location | Mark the intended parting line on the file. Route it through a hair break, groove, or color boundary. |
| 5. Minimum feature relief | 0.3 mm lashes, engraved fur, tiny logo on the belly | Disappears into the surface, or fills solid with ink during decoration | Raise or deepen the feature, or move it to a printed element on a flat area. |
| 6. Corner radius | Sharp internal corners at every junction | Sharp internal corners are tear initiators — the crack starts there, not where you squeezed | Radius internal corners to roughly half the local wall thickness. |
| 7. Construction: hollow, filled, or solid | One solid body, because that is how it was sculpted | Solid elastomer behaves like a rubber ball: fast, springy, and impossible to make slow-rising | Decide the construction first. Hollow shell plus filling is what produces slow rise. |
| 8. Color method | Six colors, treated as free | Every color is a station, a print pass, or a separate part — and ink cracks where the part flexes | Consolidate. Molded-in color survives flexing; printed detail belongs on low-strain areas. |
| 9. Sealing and fill port | Nothing. Filling happens "later". | Port plug sits proud on a visible face, or leaves a leak path that shows up as a return | Place the port on a hidden face and design a recess that accepts the plug flush. |
If you want to argue with a designer about one row, argue about the first. Wall uniformity is the single strongest predictor of whether a squishy feels expensive. Shape gets you the first squeeze; wall consistency gets you the second through the two-hundredth, after the novelty has worn off and the customer is judging whether it feels like a five-dollar object or a fifteen-dollar one.
Rule seven is the one that surprises people, so it gets its own section below.
Where the render lies: feature size
Renders are resolution-independent. Molds are not. The table below is the practical band we work in for soft TPR shells — the sizes at which details survive repeated molding, filling, packing, and shipping.
| Feature | Practical range in soft TPR | What happens past the limit |
|---|---|---|
| Raised relief (fur, brows, ridges) | Needs real height to read at all | Below the threshold it visually disappears on a matte surface |
| Recessed detail (eye sockets, mouth line) | Shallow recesses read; very shallow ones clog | Traps air on the fill and holds ink during pad printing |
| Whiskers, lashes, thin fins | Only as free-standing elements at generous thickness | Tear at demold, or fold over permanently in the polybag |
| Limbs and tails | Thick enough to be stripped without necking | Necking and stress whitening at the joint; a visible white ring on a dark part |
| Teeth and claws | Blunt, rounded, few | Sharp tips are the first thing to break and the first thing a returns desk sees |
| Text and logos in the tool | Large, bold, few characters | Thin strokes fill with ink or vanish; small type is unreadable after two print passes |
| Surface texture | Open patterns that do not trap material | Fine texture scuffs on demold and turns glossy where the customer touches it |
The honest version of this table is uncomfortable: the difference between a striking design and a producible one is usually two or three features, and the fix is almost always enlarging something rather than adding something. Detail is not free. It is paid for in tooling, in in-process scrap, and in the share of units that fail to demold cleanly.
Hollow, filled, or solid — this decides the feel before the shape does
Buyers ask us to match a reference sample's "squish" constantly, and the answer is almost never a shape answer. It is a construction answer. A hollow shell with a granular filling and a solid cast body can look identical in a photograph and behave like two different products in the hand.
| Construction | How it feels | Slow rise | Design freedom | Best suited to |
|---|---|---|---|---|
| Hollow shell + granular filling | Soft, slightly weighted, dull thud, holds a squeeze for a beat | Yes | High — the shell is thin, so deep draws are easier | Classic slow-rise characters, large shapes, gift and desk formats |
| Hollow shell + viscous filling | Slower, wetter, heavier; the shape slumps and recovers | Yes, and the slowest of the group | Medium — filling flow limits very narrow channels | Large formats where the motion is the point |
| Hollow, unfilled (air only) | Light, hollow, cheap-feeling; rebounds fast | No | High | Very large pieces where weight is a freight problem |
| Solid cast | Dense, bouncy, immediate rebound | No — physically not achievable | Low — thick sections resist fine detail and demolding | Small dense parts, balls, keychain-scale items |
| Multi-part, assembled | Depends on the assembly; can combine a hard face with a soft body | Depends on the body | Highest, at a cost | Characters with accessories, hard inserts, mixed material looks |
This is why the phrase "same feel, cheaper" is usually a construction request in disguise. A buyer comparing quotes across three factories is often comparing a filled hollow part against a solid one, and the two prices were never comparable to begin with.
If you already have a production sample you are happy with, treat it as the specification and send it. If you do not, define the construction, the target weight, and the target recovery in writing before anyone quotes. Our slow-rise squishy QC criteria cover how that recovery gets measured; the point here is only that the decision cannot be deferred to the factory.
What a 3D print can and cannot prove
We print prototypes before tooling on nearly every custom project, and it saves money on almost all of them. It also creates a specific kind of false confidence, because a printed part is a geometry check wearing the costume of a product sample.
| What you are checking | 3D printed prototype | Molded TPR sample |
|---|---|---|
| Silhouette and proportion | Reliable | Reliable |
| Scale in the hand | Reliable | Reliable |
| Seam and parting-line position | Cannot show it | Only place it can be judged |
| Draft and demold behaviour | Cannot show it | Visible as drag, scuff, whitening |
| Wall uniformity | Not representative | Directly felt |
| Rebound and squeeze feel | Misleading — printed material is not the product material | Accurate |
| Weight and balance in hand | Wrong, often badly | Accurate |
| Paint adhesion under flexing | Cannot show it | Shown by flexing the decorated sample |
| Drop and tear durability | Indicative at best | Meaningful |
| Cost of changing your mind | Low | High — this is the deadline that matters |
The five things we ask for before quoting
None of these are paperwork. Each one removes a round of sampling.
- The file at final scale, STEP or STL, with units confirmed. A model that was scaled "to look right in the viewer" is the most common source of a wrong-size tool.
- A marked-up view showing the intended parting line, plus which faces must stay clean. Two minutes of drawing saves a mold.
- Color callouts with references, and a note on which are molded-in and which are printed. "Red" is not a color; it is a negotiation.
- Target weight and target squeeze feel, in words or as a reference sample. Weight is the fastest proxy for construction, and construction is what the price depends on.
- The packaging constraint — window box, blister, polybag, display carton. Packaging decides where a seam is allowed to hide, and it is always cheaper to know before tooling than after.
What we say no to
A factory that accepts every file is a factory that will quietly change your design and tell you afterwards. We would rather decline at the quoting stage:
- Sub-millimetre sculpting and realistic skin texture. Soft TPR cannot hold it, and a mold that tries produces scrap instead of detail.
- Deep undercuts and hair-thin appendages. They tear at demold or fold in the bag.
- Highly detailed realistic figures in the monster or collectible-figurine register. That is a different material family and a different factory.
- Eight colors on a single small face. We will propose splitting the character into parts, which usually looks better anyway.
The trade is straightforward: simplify two or three features, and the part goes from "possible with pain" to "runs clean at volume". Designers tend to resist this until they see the first molded sample, at which point the argument ends on its own.
Questions we get on nearly every project
Can you make a solid squishy that slow-rises?
No. Solid elastomer stores and returns energy quickly; that is what makes a rubber ball bounce. Slow rise depends on a hollow shell deforming around a filling that resists and then yields. If slow rise is in your brief, the construction is not optional.
What wall thickness should I design to?
It scales with part size rather than being one number, and it is set by how hard the part will be squeezed. What matters most is consistency: a shell that varies widely across the body will feel wrong in the hand no matter what the nominal value is. Bring us the intended squeeze and we will size it with you.
Can you match my render exactly?
Shape, proportion, and color, yes, within the DFM changes above. Sub-millimetre relief, no — not in this material. We will show you the changes on a marked-up file before tooling rather than after.
Does a 3D printed sample prove the feel?
No. It proves geometry and scale. Feel comes from construction, wall, and filling, and only a molded sample answers that. Our guide to reading a squishy sample covers what to check when it arrives.
Why does an extra color cost so much more than an extra shape?
Because a color is a station — a second tool, a print pass, or a separate part plus assembly. A shape change often costs nothing once the tool exists; a color change rarely does.
Next step
Send the STEP file with the parting line marked. We return a DFM mark-up — wall, draft, undercuts, feature limits, construction recommendation — before any tooling is quoted. If the design needs three changes to run clean, you will read it in that document, not in round two of sampling.
Start with OEM/ODM squishy development, look at our squishy manufacturing capability, browse new TPR squishy designs, or send your design file directly.
Notes on method. Hardness in this article follows the Shore scale as measured under ASTM D2240. Dimensional tolerance bands for rubber parts are conventionally expressed using the classes in ISO 3302-1; we use them as a shared vocabulary with buyers, not as a product claim. Safety testing scope depends on the destination market and is set per order. Wall, draft, and feature figures described here are practical ranges from our own tooling and sampling record, not universal constants — treat them as a starting point for a conversation, not a specification you can copy.